- Browser
- Course Location
- Digital Resources
- Grades
- Modules
- Need Help?
- Pacing
- Profile / Notifications
- webReader
CHOOSING THE RIGHT BROWSER
Because it’s built using web standards, Canvas runs on Windows, Mac, Linux, iOS, Android, or any other device with a modern web browser. Canvas supports the last two versions of every browser release. We highly recommend updating to the newest version of whatever browser you are using, as well as the most up-to-date Flash plug-in. To use Canvas features on mobile devices, you should download and use the Canvas app for Android or iOS devices. For specific browser details, read the information below.
RECOMMENDED BROWSER
![]() Although many current browsers are supported, we recommend using Google Chrome.
Although many current browsers are supported, we recommend using Google Chrome.
Please download Chrome now, if you don’t have it. If you get unexpected errors, it is probably because you are using an old or unsupported browser.
As with any online learning management system, if you experience difficulty with any of the supported browsers, it is recommended that you:
- First, see if there are any updates available.
- Then try using an alternate browser to see if this resolves the problem.
- If problems persist, please contact the help desk, by clicking on “Help” in the top right-hand corner of the Canvas page.
BROWSER PRIVACY SETTINGS
![]() To avoid mixed content errors, you will need to use this tip to see the content inside your course occasionally.
To avoid mixed content errors, you will need to use this tip to see the content inside your course occasionally.
If you get an error at the top of a page that looks something like the one below and says, “You are trying to launch insecure content from within a secure site (Canvas). Some web browsers may prevent this content from loading.” You may be experiencing a mixed content error in your web browser.
A mixed content error means that you are trying to access non-secure (http) content on a secure site (https). Since Canvas is hosted on https, sometimes embedded videos or files that are not secure (http) create this error.
It is safe to access these resources, but you will need to take an additional step to eliminate the error.
Adjust the settings in Chrome
![]()
If you visit a page in your Canvas course that is linked to insecure content the content will be blank or missing on the page. You can choose to override the security restriction and display the content by clicking on the lock icon at the beginning of the URL. Then scroll down to the Insecure content at the bottom and change it to allow.
![]()
Adjusting the Settings in Firefox
 If you visit a page in your Canvas course that is linked to insecure content, Firefox will display a shield icon in the browser address bar [1].
You can choose to override the security restriction and display the content anyway by clicking the shield icon, clicking the Keep Blocking drop-down menu [2], and selecting the Disable Protection on This Page option [3].
CHECKING YOUR SETTINGS
Wondering if your browser has what it takes to fully participate in online learning? For additional information on choosing the right browser, you can read more in the Canvas Guides.
Find Your Course(s)
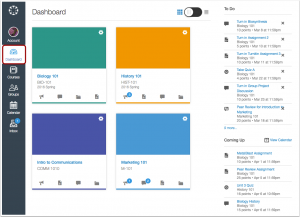
Once you’ve logged into Canvas, you will see your courses on the dashboard. Each course is designated by a unique color.
The Dashboard helps you see what is happening in all your courses. It is designed to answer the questions, “What is going on in all of my courses?” and “What do I need to do next?”
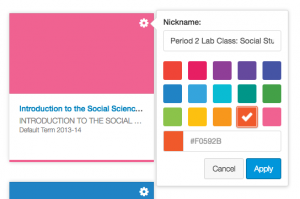
If you don’t see a course, or you want to modify the courses that appear here, you can customize your view. Here’s how:
- Click on Course in the left navigation. A list of your courses will appear in a drop-down menu.
- Select All Courses to show all your current, future, and past enrollments
- Select the name of the course that you would like to enter.
- Or, you can customize your courses that appear in the drop-down menu. This allows you to choose different courses to appear on your dashboard.
Canvas has created this page to help students get started.
WATCH THIS VIDEO
Watch the video below to complete your learning about Canvas Navigation. The video below reviews the best way to access the content in your online class. Be sure to use the steps discussed in the video to ensure you don’t miss any important lessons or learning materials in your course.
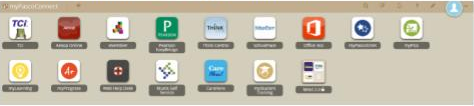
Accessing your Digital Resources through myPascoConnect
STUDENTS! Did you know you can access your school’s online resources and learning materials on myPascoConnect? Along with access to Canvas (MyLearning), you also have access to digital textbooks, resources, and Office 365, which gives you the ability to download on your home computers or use the cloud-based versions to always have access to your classwork.
In order to log in through MyPasco Connect:
- Launch Chrome
- Go to https://mypascoconnect.pasco.k12.fl.us/ (Links to an external site.)
- Click on the blue button that says Sign in to myPascoConnect
- Sign in with the following credentials:
- Username: Student ID/Lunch # (ex. 123456)
- Password: LDAP Password (ex. Stars21#)
- Verify your password two more times, click submit.
- (You will only be required to do this the first time you log in.)
- You are now on your LaunchPad. Simply click on an icon to access the resource.
* Please note that some applications will require you to login the first time so that myPascoConnect can store your password and use it for future logins.
©Pasco eSchool, Pasco County Schools
ACCESS YOUR ONLINE COURSE GRADES
★ You can find your grades by using the Grades button on the course navigation or global navigation menus.
Your course grades screen will list your graded assignments, quizzes, and discussions and will allow you to review teacher feedback, rubrics, and other assignment details. You can also use the “what if” feature in the grades screen to see how scores on ungraded assignments will impact your final grade in the course. Using the “what if” feature does not change your actual grade, it just allows you to test how different scenarios will impact your final score.
HOW TO CHECK YOUR GRADES IN CANVAS
You can find your grades in various places.
- Inside a course, you can view recent feedback on the right, and view all your course grades by clicking on the grades tab, on the left.
- When you have been recently graded you can see them under “View Grades” on the right side of the dashboard, as well as be notified by email or text messaging, depending on what you have set up your notifications.
NOTE that when you look at your course grades, there are two options. To view your current grade in the course so far, you can check the Calculate based only on grade assignments box. This shows the grades so far in a course. The student is doing well with 100% but this is just the beginning of the course. The student must keep submitting assignments to keep that grade high. “What-if” scores also allow you to put in grades to see what you would need to earn to achieve your goals.
★ Watch the video below to complete your learning about accessing grades.
The video below reviews the best way to access grades for your online class. It also reviews how to use the “what if” feature and how to see different details about your assignment scores.
USE MODULES TO ACCESS YOUR LESSONS
★ The best way to navigate your class is through the Modules tab, which contains an outline of all of your required lessons and activities.
Each Module will contain files, discussions, assignments, quizzes, and other learning materials for the course in the order that you should complete them. Once you click on a link in the Modules area, you can use the Next and Previous buttons at the bottom of the page to continue with your lesson.

HOW TO USE MODULES
- Click the Modules tab on the left navigation bar of your online class.
- Review the Module requirements, which may include:
- Modules might have to be completed in order. You can see under each Module which other Module must be completed before you can move on.
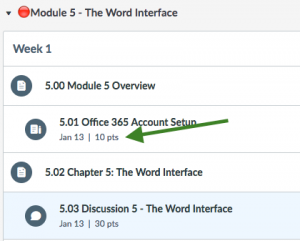
- If due dates have been set, they will appear next to the items in the Modules outline.
- If set by your teacher, item completion requirements will be noted under each item.
- Select the first item in the outline to begin or the item where you previously left off.
- Use the Next and Previous buttons at the bottom of each page to progress through the course.
- IMPORTANT If you come across an assignment or page that says it is locked, it means you have not completed a previous assignment or page, and you should go back through the Modules to see what you have missed.
HAVING TROUBLE? WE ARE HERE TO HELP!
If you need Academic Help, please contact your teacher.
Our different courses are offered on different learning management systems. Please see the information about the platform that your course is on below to learn how to access, use, and seek help on that system. If you are unsure about which platform your course is taught, you can find that information on our website.
Canvas / myLearning System Requirements: View the Browser and Plugin Requirements
Getting Support
★ If you need help, click the Help icon on the left-hand global navigation menu.
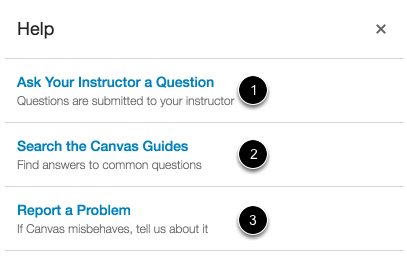
You will see three support options:
- Ask your Instructor a Question: Ask your instructor questions about course material or send them a message.
- Search the Canvas Guides: The Canvas Guides are an amazing resource for students to use if they need a “how-to” answer in Canvas. Search the Canvas Guides for information about features inside of Canvas. Each guide provides different lessons to help users understand how Canvas works. The lessons are continually updated. The downloadable PDF manuals are updated as well. To learn more, you can visit the Canvas Guides.
- Report a Problem: Submit problems with Canvas to our support team. When creating a ticket, be sure to provide a detailed description of the problem. You may be asked to provide more detail about an issue, so be sure to check your communications and follow up with support if necessary.
VIEWING YOUR DUE DATES
There are several areas you can view your due dates including:
- The To-Do List on the course homepage.
- The Modules Tab
- The Grades Tab
- Within each assignment/activity.
Module view for due dates
Grades view for due dates.
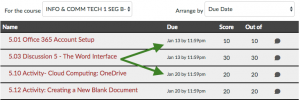
Assignment view for due dates
![]()
★ Do your best to stay on pace and to meet each expected deadline. If you need additional time or would like to adjust your due dates, please discuss this with your instructor.
Printing a Pace Chart
If you would like to print a pace chart for your records, click the Grades tab and the Print Grades icon at the top of the page. This will give you a list of all of the assignments in the segment and your expected due date for each.
![]()
ADD YOUR NOTIFICATION EMAIL (REQUIRED)
★ You are required to add AT LEAST ONE email address in your profile settings.
Your personal Account settings include contact information and other settings that will help your instructor identify you and will help Canvas notify you. From the Account link, you can also upload a profile picture and set up notifications, which allows you to pick what types of contacts you receive and how frequently you receive them. Please review the information below carefully as you will be required to submit proof of at least one email added to your Settings link in order to complete this introduction module.
HOW TO UPDATE YOUR CONTACT INFORMATION
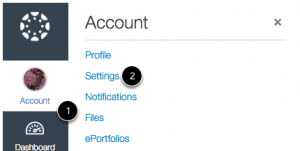
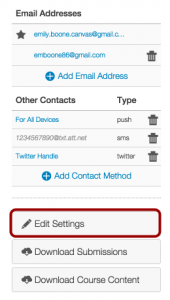
- In Global Navigation, click the Account link, then click the Settings link.
- Click the Edit Settings button.
- Enter at least one email as your default email address.
- In the Ways to Contact sidebar, under Email Addresses, you can tell what email address is your default by the star icon next to the email address. This email is where Canvas will send notifications from your classes.
- Open your email account you just added. Click the link that is in the email to finish registering the email address.
HOW TO UPDATE YOUR PROFILE SETTINGS
- In Global Navigation, click the Account link, then click the Settings link.
- On the Personal Settings page, click the placeholder profile picture icon. A dialog box will open.
- Upload or take a picture using the camera tool. You are welcome to crop or edit the image. *Be sure your image is appropriate for a school setting.
- You are also encouraged to add a personal bio, other ways to contact, or links.
- When you are done, click the Save Profile button.
NOTE: You can also link to other services (Google Drive, Twitter, Skype, etc.) by clicking the service’s button under Other Services.
HOW TO UPDATE YOUR NOTIFICATION SETTINGS
- Locate and click the Notifications navigation link.
- Edit Notification Preferences by clicking the Checkmark, Clock, Calendar, and X icons for each Course Activity.
WATCH THIS VIDEO
★ Watch the video below to complete your learning about User Profiles.
The video below reviews the process of adding an email address and changing your profile picture. If you are still unsure of how to add your notification email, please watch the video below.
Need some help reading a page? You have a Text-to-Speech tool right in your canvas course!
![]() Click on the gray box with a black arrow at the bottom of the left navigation bar to open the WebReader.
Click on the gray box with a black arrow at the bottom of the left navigation bar to open the WebReader.
Look at the graphic below to see what the buttons do!
Tool Highlights
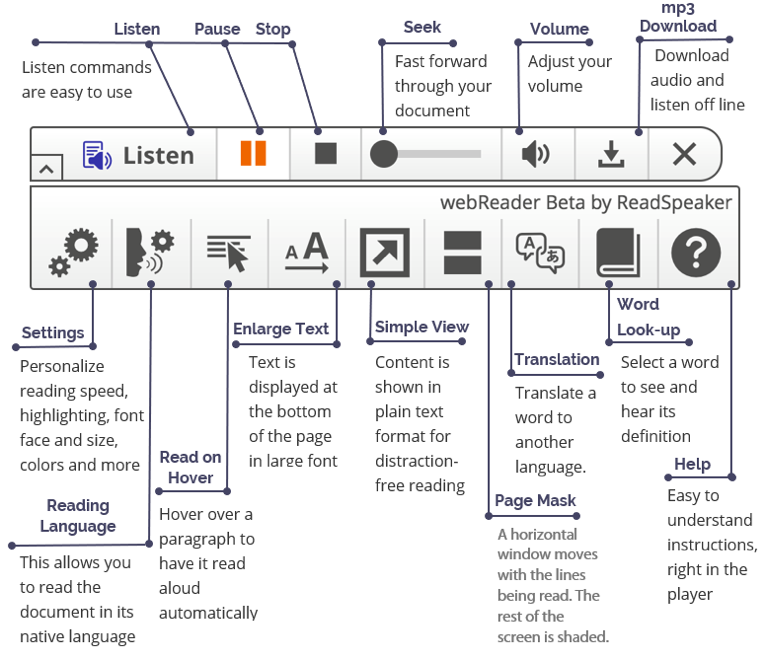
Highlights of webReader
- Fast forward through your streaming document with the Seek tool.
- Adjust the volume and the settings to your preferences. This will need to be done on each device.
- Download the audio for off line listening.
- The Read on Hover tool allows you to move your cursor down the page highlighting paragraphs to be read.
- The Enlarge Text tool shows the magnified text at the bottom of the page for those with lower vision or who are distracted readers.
- For the distracted reader, the Simple View tool (removes decorative images), or the Page Mask tool will be good options.
Don’t know a word? Translate it to a different language with the Translation tool or look it up in the dictionary option called Word Lookup.